As a Writer user, to create a report for an existing or new client, click Write report from the main dashboard. You'll be directed to the Write report page that looks like this.

Existing client(s)
To create a new report for an existing client, locate and select the client using the client search and add them to the Selected client(s) list.
To search for an existing client, simply select the user from the 'Owned by' drop down menu * and enter all, or part of the client’s last name and click Search. If you’re not entirely sure which user the client is saved under you can use the All Users option at the top of the list. A new window will open where you can select the client(s) and then click Save.

You’ll be returned to the main Write report page where you’ll now see that the client(s) has been added to the Selected clients list.

* Only users that have had view all users' clients / reports activated for them will see the 'Owned by' drop down.
New client(s)
To create a report for a new client, simply click one of the relevant Add client buttons:

and a new window will open.

Here you'll be prompted to enter some basic client details. The client information is arranged over five tabs, and you don't have to complete all of the fields, and there may be good reasons why you do not want or need to. Moreover, only those fields that you do complete will be included in the summary of client circumstances table included in your report.
On clicking Save at the bottom of the ‘personal details’ tab, you can then progress through the other tabs. Every time you click save at the bottom of each tab, or click on a new tab, this will automatically save the data that’s been entered up to that point. Once you’re done, click Save and exit at the bottom of the ‘Further client information’ tab and the client will be added to the Selected client(s) list and automatically saved to the user's Client Library for future use.
Selected client(s) list
Once a client has been added to the Selected client(s) list, you can then (using the icons to the right) to:
- edit their details; or
- remove them from the Selected client(s) list.
To proceed with writing a new report, simply click Next step.

Report creation method
Next you'll be prompted to select the method you wish to use to create the initial framework for your report.

There are four options available:
1) Use the Genovo AI Assistant (Gena)
This is an AI-powered method of creating the initial framework for your report. Simply articulate the advice scenario(s) you’re looking to cover off in your report in the form of a brief text prompt (you can type, paste or speak the prompt). How you construct the prompt is important to give Gena the best chance of creating the report correctly. This Knowledge Base article explains everything you need to know about how to write an effective prompt.

Gena will then analyse the prompt, give the report a name, select the most appropriate Report Type for the advice scenario and automatically add the required sections, and insert the relevant plans into these sections.
2) From scratch
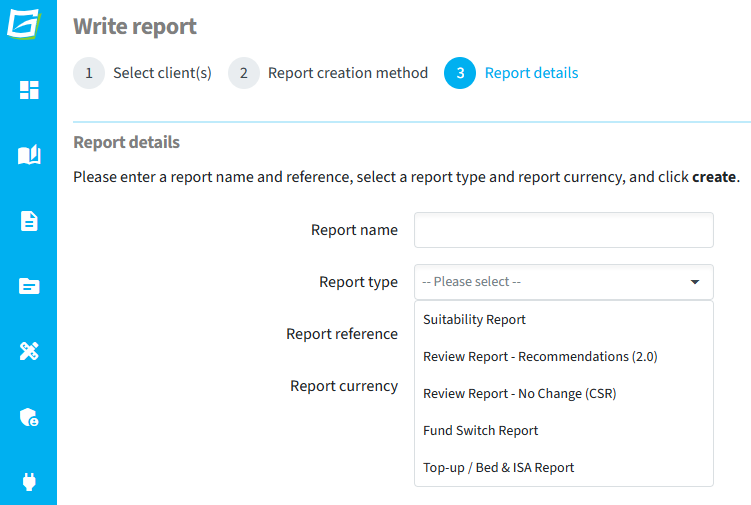
This is the standard 'vanilla' option. You’ll be prompted to give the report a name and select the Report Type. Genovo has a number of different Report Types which have all been designed to cater for slightly different advice scenarios. You can also insert a report reference and select the currency you wish to use.

3) Using a pre-configured advice scenario
On selecting this option you’re once again prompted to give the report a name, insert a report reference and select the currency. However, instead of selecting a Report Type you’re prompted to select an advice scenario. With this option the Report Type will be automatically selected for you, and any additional sections that you'll need to complete on top of the standard core sections will be auto-inserted into the Report Builder for you.

4) From an existing template
This option uses a pre-configured Report Builder just like the previous creation method but this time the sections are partially completed. It can therefore prove to be a very quick and effective way to build a report. Once again, you'll be prompted to give the report a name, insert a report reference and select the currency.

Report Builder
On clicking Create you'll be directed to the Report Builder. As the name suggests, the Report Builder allows Writer users to manage and add content to the sections that make up the draft report.
Genovo is a multi-product, multi section modular report builder that allows you to deal with multiple advice scenarios and recommendations in one report, and therefore irrespective of the method you choose to create your report, you can always add or remove sections from the Report Builder as required.
